|
|
The Cheap Stone Wall
We always want to hear how you have improved or changed our projects.
Here's a great idea for the Stone Wall. Howard shows how he used one of
the basic ideas here to produce a very simple, useable wall. Thanks, Scary
Guy!
Check out Howard Kennedy's version of Stone
Walls!
The Cheap Stone Wall (pt. 1)
Here's a great way to build durable, inexpensive rock or brick walls
for caverns or dungeons
(my favorite places).
Materials:
- Wall base (plywood, styrofoam or sheetrock panels with framing support)
- Sheetrock/gypsum board joint compound (in the 5gal bucket)
- Paint (1-2gal. -the cheaper the better)
- Cement walkway form (around $20 from Home Depot).
- 4"-6" paint scraper.
- Paint roller and/or brush
- Cleanup rags, water
The Process:
Decide on what finish you want up front - this determines the form you
buy (brick or stone) and the colors of paint you will buy:
black and white paint for a rock finish;
red, white, and black paint for a brick finish.
OR -just use whatever paint is lying around and experiment!
A pic of a Crypt facade that I'm building
Stone Finsh
I'll talk about the stone finish first:
- Paint the base (I used plywood) with thinned black paint to seal the
plywood and to show the seams between the 'rocks'.
- Mix black paint into the joint compound. (I used a paint mixer with
a drill to help the mixing). Keep mixing and adding paint until the
joint compound is a dark grey color.
- Use the paint scraper (or trowel) and liberally spread the joint compound
over the entire surface - IMPORTANT NOTE: don't be skimpy! the sloppier/thicker
it is the better!.
- Use the cement form and press/wiggle it into the joint compound until
it is firmly seated against the plywood (squeezing out the compound),
then remove it. Turn the form around until it matches the edge on the
wall, the repeat. Keep going until the entire wall has the pattern.
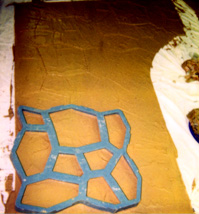
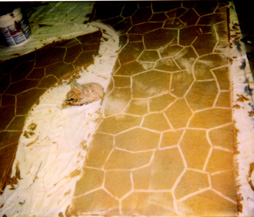
Using the Concrete Form to press the stones into the joint compound
- Scrape the edge of the paint scraper along each line to accent the
edge, or use a small piece of wood. The idea is to reveal the black
paint underneath. You can slop on more joint compound as think you'll
need. Dont worry about being neat!
- Wipe the flat side of the scraper against the wall to add texture
to the 'rocks'. Let it dry.
- After drying, use a small brush with a bit of thinned black paint
to add detailing: accent edges, add/accent shadows, accent seams, etc.
Age the stones with a bit of dark green paint applied with a stippling
brush (or a rag).
Brick Finish
Now, for a brick finish:
Paint the base with thinned white paint mixed with just a little black
to simulate a mortar look. Adding any 'beige' color will work too. Experiment!
Then paint to seal the plywood and to show the seams between the 'bricks'.
Mix red paint with a little black paint into the joint compound for
a red brick color - remember the joint compound will be a bit lighter
when it dries. (I used a paint mixer with a drill to help the mixing).
Keep mixing and adding paint until the joint compound is a medium to dark
red color.
Use the paint scraper (or trowel) and liberally spread the joint compound
over the entire surface - IMPORTANT NOTE: don't be skimpy! the sloppier/thicker
it is the better!.
Use the brick form and press/wiggle it into the joint compound until
it is firmly seated against the plywood (squeezing out the compound),
then remove it. Turn the form around until it matches the edge on the
wall, the repeat. Keep going until the entire wall has the pattern.
Use a small piece of wood about the size of the mortar seam to scrape
away the brick color. The idea is to reveal the mortar-colored paint underneath.
You need to be just a bit neater than stone for a brick finish - but not
a whole lot!
Wipe the flat side of the scraper against the wall to smooth texture
to the 'bricks'. Let it dry. Age the bricks with a bit of dark green paint
applied with a stippling brush or rag (like the stone finish). Add detailing
with off-white/yellow thin 'streaks' in the brick if you want!
Ta da! portable stone or brick walls. Use a light along the side to accent
the pattern, it looks great! The walls can be assembled side-by-side either
straight or on angles. The seam between the panels may be ignored if it
is real dark in the haunt (no kidding, they just 'seam' to disappear...),
or you can add a styrofoam post painted dark brown to simulate a support
for a mine shaft.
I've got several of these and they're very durable and look great!
Back To Top
NOTE:
Before using any information here,
please read our Disclaimer.

Copyright
© 1995-2008 Myth Adventures, Inc.
All Rights Reserved
|