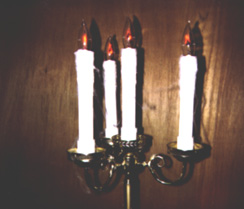
An Inexpensive Haunted Candelabra

An inexpensive candelabra can be constructed using (of all things)
ceiling fan parts! Most all ceiling fans have ornamental (and sometimes
useful) globe or 'sconce' style light fixtures attached to their bottoms.
This metal piece, flipped over, makes a great holder for candles (electric,
of course). A few more lamp parts, some plastic pipe, lamp sockets,
flicker bulbs, a bit of zip-cord, a plug, some paint, a couple of hours
and you have a great candelabra ready for spider webs and a dark corner!
Replacement fan-lamp parts are in bins at HQ, Home Depot and Lowes (around
here anyway) for $2-$8 depending on how ornate the metal pieces are.
I chose a three light armature model (there are also four and even five
lamp models!). The more ornate the armature, the better. The most expensive
armatures didn't look as good as the middle-of-the-price-range models.
(I think I paid about $4 for the armature). The center (the part that
attaches to the fan) may not have a 'cup' to put a candle into (mine
didn't). I bought a single lamp-holder piece (about $2) and attached
it to the center using the lamp-type threaded hardware included in the
pack.
Holding the assembly upright (or upside down depending on your orientation...)
you now have a four-candle candelabra, sort of. I used a 15" piece
of 3/4" copper pipe, a threaded rod, and some large washers to
attach the 'handle' to the bottom of the center candle holder. Since
my first use was to mount the candelabra outside on my gate posts, I
used a 3/4" copper threaded adapter (the pipe slips in one end,
threads on the other) and screwed it into a 3/4" flat flange as
a base. [the flange was nailed to the top of the post]. Any imaginative
base will work, depending where you want to use it. (other ways welcome!)
Another use I had for these candelabras (I've built several now), was
as floor standing 'lamps' at an entryway. I decided the 'lamps' needed
to be about 4' to 5' tall, so I cut a piece of electrical conduit to
length and painted it. I 'recycled' the short-handled version by removing
the base flange and pipe, then put the threaded rod (still attached
to the armature assembly) into the pole - threading the zip-cord through
the pole as I went. A severe lack of time prevented me from building
a really great base (again), so I sat the entire 'lamp' into an old
bucket, then filled it with concrete! After it dried, I cut away the
bucket - and I was surprised how well the concrete looked. Just a couple
of splotches of paint, and the base worked very well (hey - it's a very
dark hallway!)
OK, that pretty well finishes the basic armature assembly. The candles
were made of a 12" piece of 1" PVC plastic plumbing pipe,
with an outdoor (ceramic) light socket attached to one end. The other
end was fitted into the armature cup using a 1" coupling 'glued'
to the cup with clear silicone caulk (excellent stuff, silicone caulk...)
I used silicone to attach the socket to the top of the PVC - just glop
on, then smooth it out. This will be made secure later...
NOTE: A fellow haunter suggested using
hot glue instead of silicone caulk to attach the parts as well as create
the candle wax drippings. If you don't like the smell of vinegar, try
hot glue! Much thanks to ScaryGuy Bill Lewis for the insight!
I used a bit of zip-cord, and attached to the socket with wire nuts,
then threaded the cord through the cup, armature and out through the
center of the fixture. After this, I pushed the PVC pipe into the coupling
(no caulking/gluing here, it will stay together, and it can be taken
apart later!).
After assembling all the candles and attaching them to the armature,
wire all the candles (including the center one!) together at the center
cup base, then thread the zip-cord through the center and out through
the base. Stand the almost ready candelabra upright in a steady place.
I used a beige spray paint to color the candles, but any color will
do - depending how you want to use it! Let this dry completely BEFORE
continuing on. Use a caulking gun with the remaining CLEAR silicone
and squirt out small lines from the top of the socket down to the middle
of the PVC pipe - this makes the "melted wax" effect on the
candle! Just a little bit of practice is all it takes to make the silicone
look perfect! You may want to use a toothpick, small scrap of wood,
or (my favorite) a torn piece of cardboard with the end shaped like
a small "U" to help form the silicone a bit better on the
candle. Note: the 'melted wax' silicone will hold the socket securely
to the top of the PVC! Attach the plug, screw in some flicker bulbs,
plug it in! This project is much simpler that I've made it sound here,
and well worth the effort.
Index
NOTE:
Before using any information here,
please read our Disclaimer.

Copyright
© 1995-2008 Myth Adventures, Inc.
All Rights Reserved

